Overview
This file illustrates few image processing pipeline using vision module from niryo_edu package. This module is based in OpenCV and its functions are detailed in Functions documentation.
from pyniryo import vision.Note
You can also import only the methods you want: from pyniryo import uncompress_image, undistort_image.
Play with Robot video stream
Get & display image from stream
Ned can share its video stream through TCP. As sending raw images will
lead to heavy packets which can saturate the network, it sends compressed images.
You access it through the robot’s function:
get_img_compressed().
Once your image is received, you firstly need to uncompress via
uncompress_image() and you can then display
it with show_img_and_wait_close().
 1from pyniryo import NiryoRobot
 2from pyniryo.vision import uncompress_image, show_img_and_wait_close
 3
 4# Connecting to robot
 5robot = NiryoRobot('<robot_ip_address>')
 6
 7# Getting image
 8img_compressed = robot.get_img_compressed()
 9# Uncompressing image
10img = uncompress_image(img_compressed)
11
12# Displaying
13show_img_and_wait_close("img_stream", img)
Note
show_img_and_wait_close() will wait for the user
to press either Q or Esc key, before closing the window.
Undistort and display video stream
In this section, we are going to display the raw video stream & the undistorted video stream.
As Ned’s camera is passing raw images to the robot, these images are distorted due to the camera lens. In order to undistort them, we need to use Ned’s camera intrinsics.
To undistort the raw image, we use undistort_image()
which needs to be called with the parameters given by Ned through
get_camera_intrinsics().
Once, we have both raw & undistorted images, we can concatenate them in order
to display them in once with concat_imgs().
Finally, we display the image show_img().
 1from pyniryo import NiryoRobot, PoseObject
 2from pyniryo.vision import uncompress_image, undistort_image, concat_imgs, show_img
 3
 4observation_pose = PoseObject(0.18, -0.01, 0.35, 3.14, -0.0, -0.24)
 5
 6# Connecting to robot
 7robot = NiryoRobot('<robot_ip_address>')
 8robot.calibrate_auto()
 9
10# Getting calibration param
11mtx, dist = robot.get_camera_intrinsics()
12# Moving to observation pose
13robot.move(observation_pose)
14
15while "User do not press Escape neither Q":
16    # Getting image
17    img_compressed = robot.get_img_compressed()
18    # Uncompressing image
19    img_raw = uncompress_image(img_compressed)
20    # Undistorting
21    img_undistort = undistort_image(img_raw, mtx, dist)
22
23    # - Display
24    # Concatenating raw image and undistorted image
25    concat_ims = concat_imgs((img_raw, img_undistort))
26
27    # Showing images
28    key = show_img("Images raw & undistorted", concat_ims, wait_ms=30)
29    if key in [27, ord("q")]:  # Will break loop if the user press Escape or Q
30        break
Note
To see more about camera distortion/undistortion, go on OpenCV Documentation about Camera Calibration.
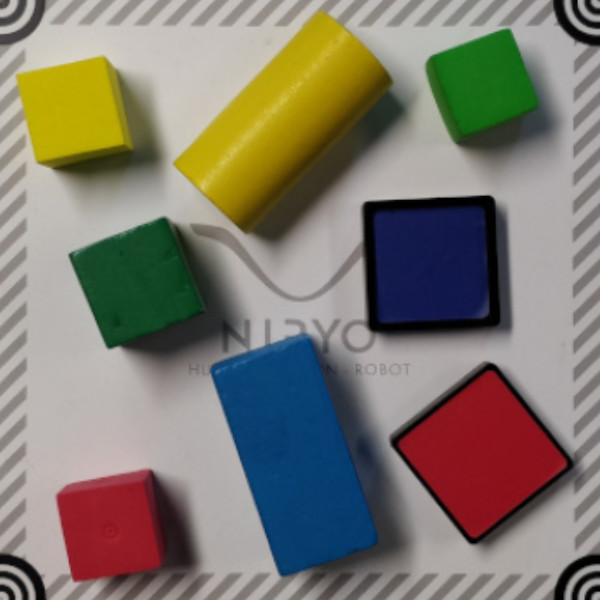
Pure image processing functions
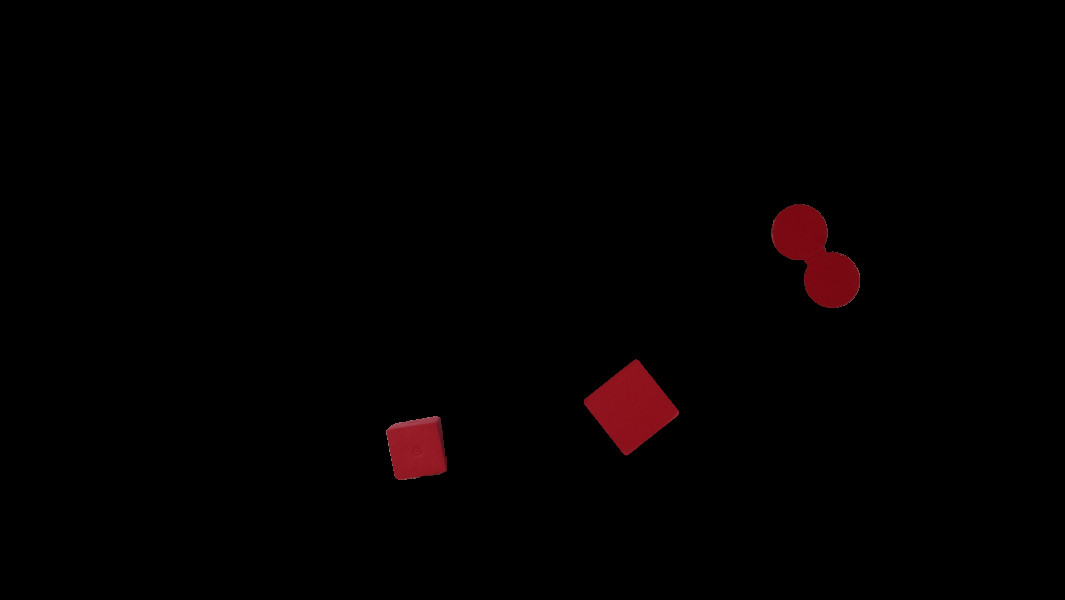
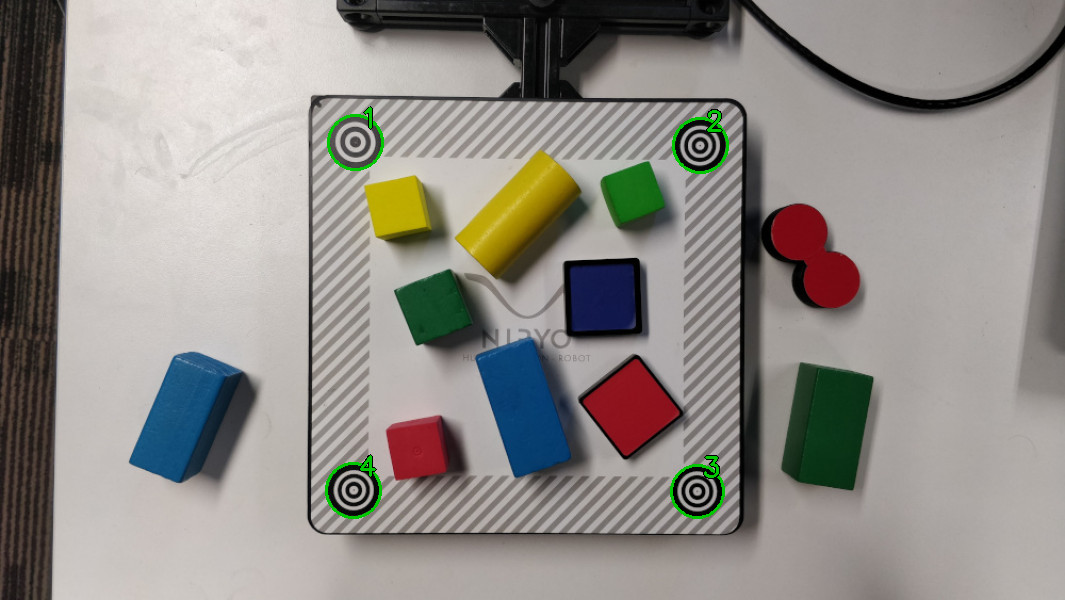
In order to illustrate functions, we are going to use the following image.
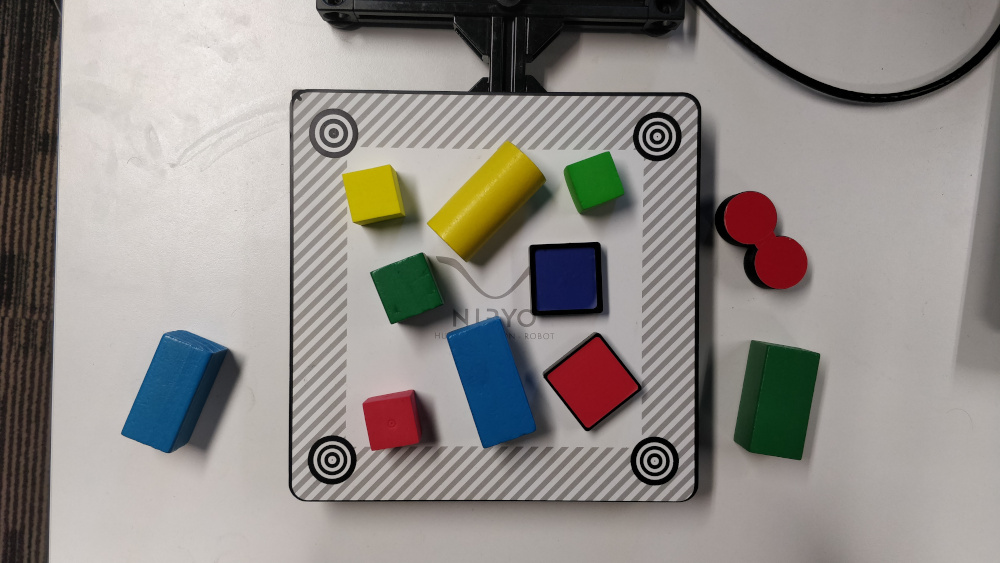
Attention
In this section it is supposed that:
You have imported
pyniryo.visionThe variable
imgis containing the image on which image processing is applied
Color thresholding
Color thresholding is very useful in order to detect object with an uniform color.
The implemented function to realize this operation is
threshold_hsv().
The following code is using parameters from ColorHSV enum
in order to threshold Red features & hand made parameters to extract Blue:
 1from pyniryo.vision import threshold_hsv, ColorHSV, show_img, show_img_and_wait_close
 2
 3img_threshold_red = threshold_hsv(img_test, *ColorHSV.RED.value)
 4
 5blue_min_hsv = [90, 85, 70]
 6blue_max_hsv = [125, 255, 255]
 7
 8img_threshold_blue = threshold_hsv(img_test, list_min_hsv=blue_min_hsv, list_max_hsv=blue_max_hsv, reverse_hue=False)
 9
10show_img("img_threshold_red", img_threshold_red)
11
12show_img_and_wait_close("img_threshold_blue", img_threshold_blue)
Thresh color |
Image result |
|---|---|
Blue |
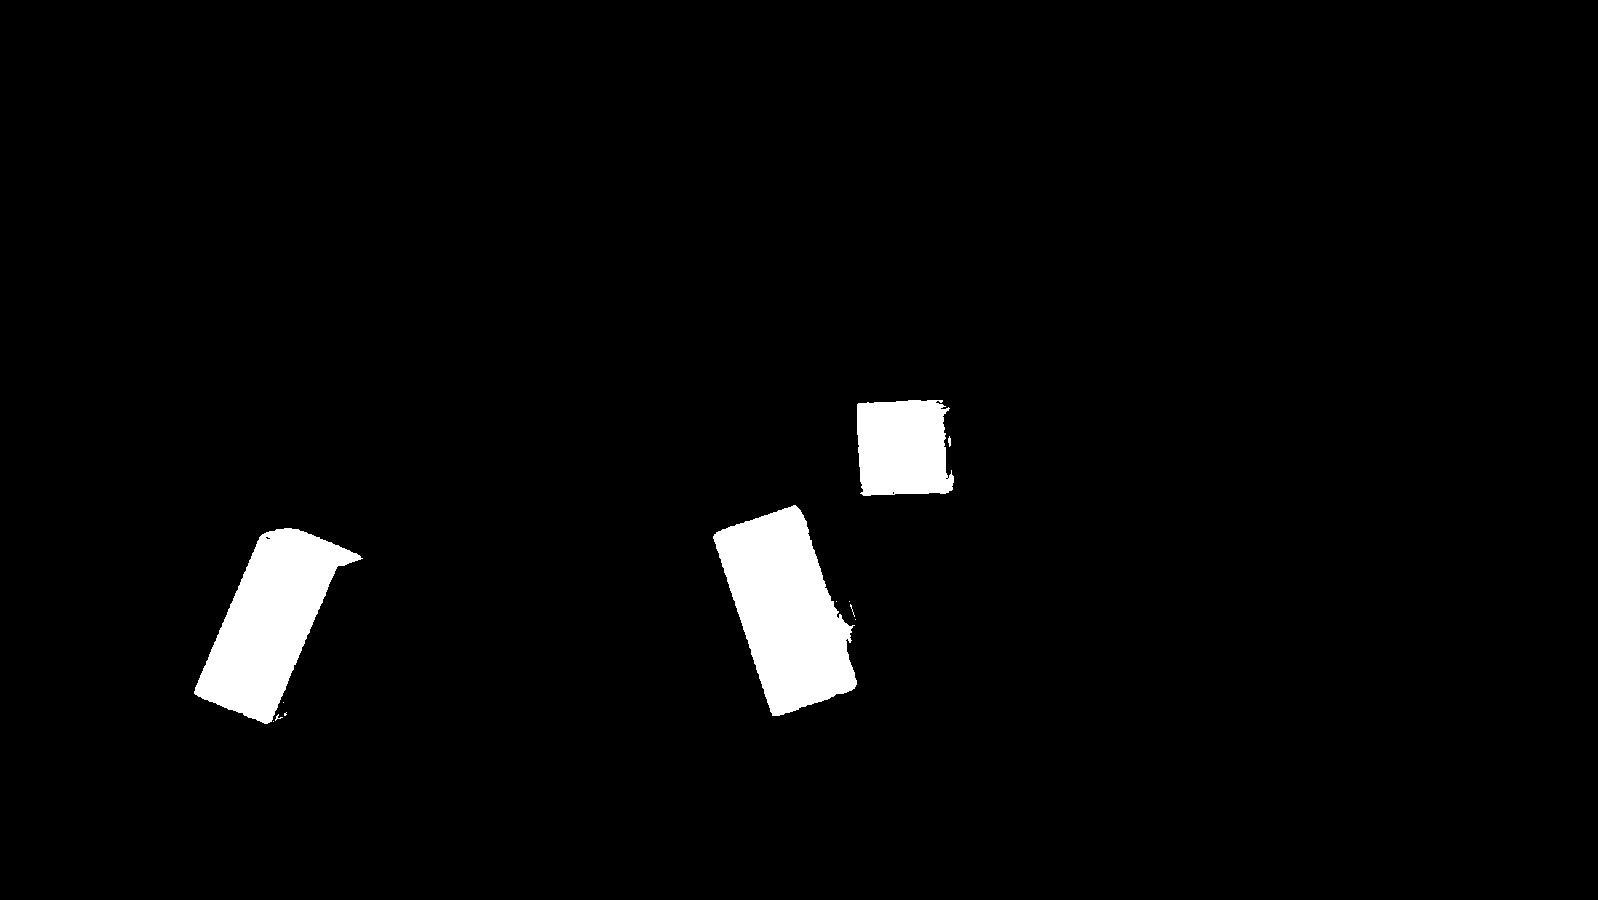
|
Red |
|
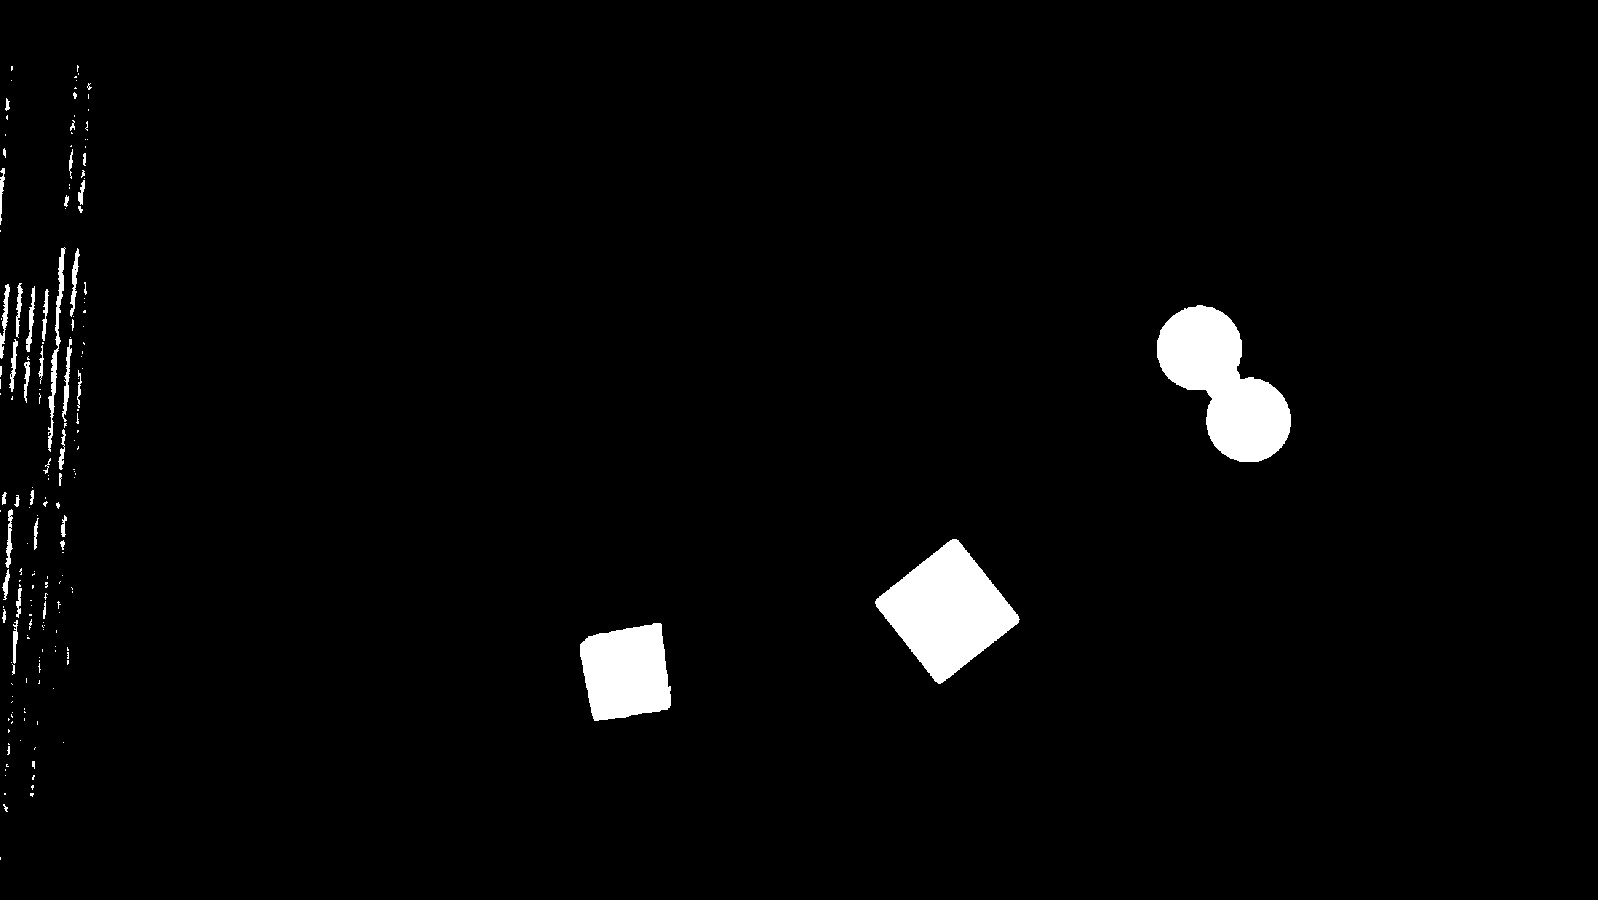
Morphological transformations
Morphological transformations are some simple operations based on the image shape. It is normally performed on binary images. It needs two inputs, one is our original image, second one is called structuring element or kernel which decides the nature of operation. Two basic morphological operators are Erosion and Dilation.
Then its variant forms like Opening, Closing also comes into play. Learn more on Wikipedia page.
The implemented function to realize these operations is
morphological_transformations().
It uses MorphoType and KernelType
to determine which operation should be applied on the image.
The code shows how to do a Closing & an Erosion:
 1from pyniryo.vision import (threshold_hsv,
 2                            ColorHSV,
 3                            morphological_transformations,
 4                            MorphoType,
 5                            KernelType,
 6                            show_img,
 7                            show_img_and_wait_close)
 8
 9img_threshold = threshold_hsv(img_test, *ColorHSV.ANY.value)
10
11img_close = morphological_transformations(img_threshold,
12                                          morpho_type=MorphoType.CLOSE,
13                                          kernel_shape=(11, 11),
14                                          kernel_type=KernelType.ELLIPSE)
15
16img_erode = morphological_transformations(img_threshold,
17                                          morpho_type=MorphoType.ERODE,
18                                          kernel_shape=(9, 9),
19                                          kernel_type=KernelType.RECT)
20
21show_img("img_threshold", img_threshold)
22show_img("img_erode", img_erode)
23show_img_and_wait_close("img_close", img_close)
Morpho type |
Image result |
|---|---|
None |

|
Erode |
|
Close |
|
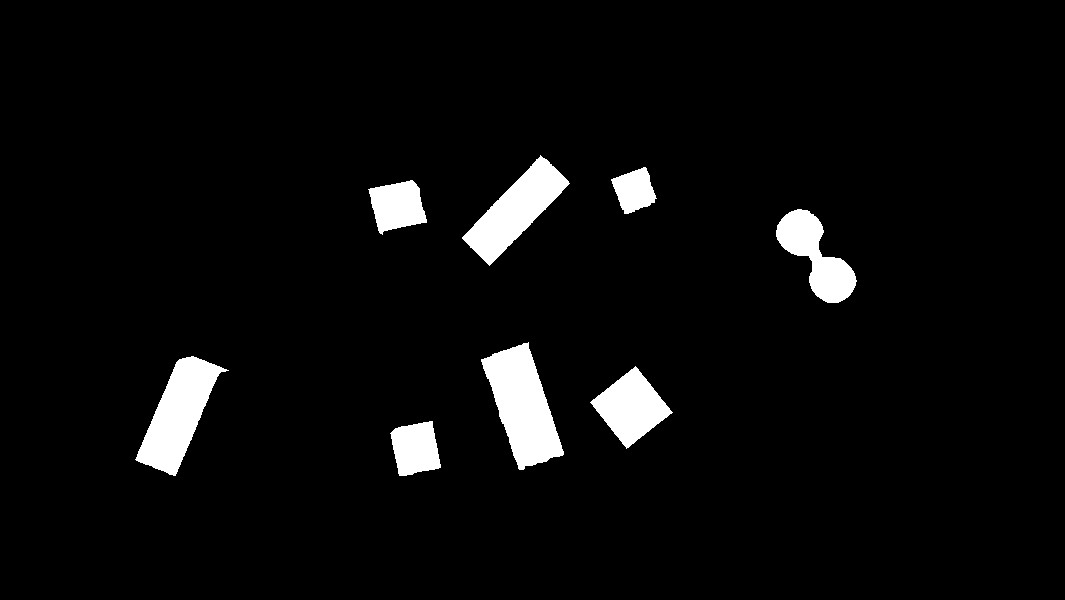
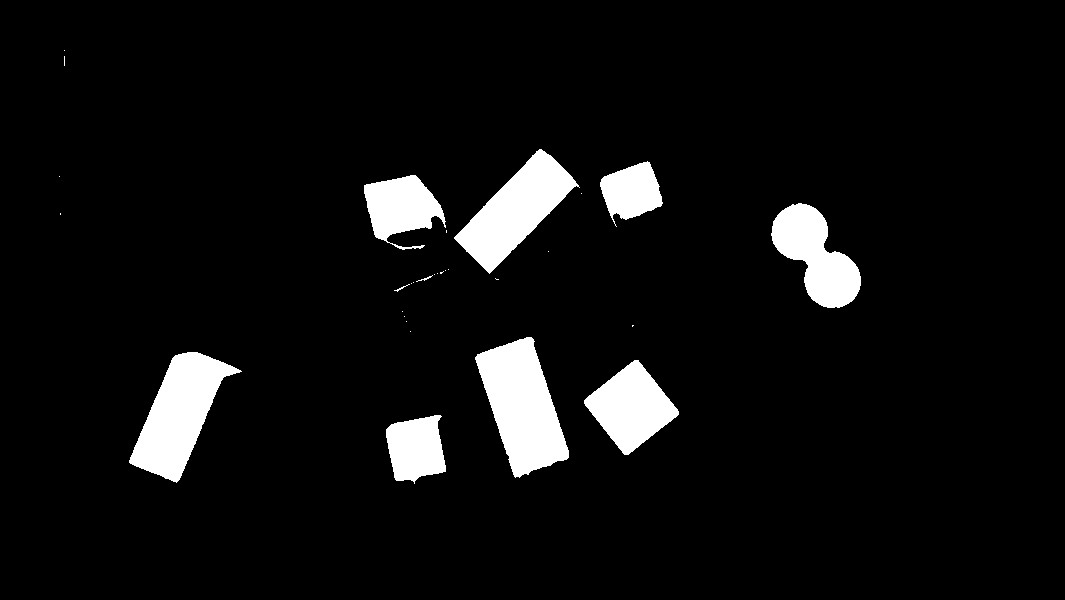
Contours finder
Contours can be explained simply as a curve joining all the continuous points (along the boundary), having same color or intensity. The contours are a useful tool for shape analysis and object detection and recognition. See more on OpenCV Documentation.
The implemented function to realize these operations is
biggest_contours_finder() which takes a
Black & White image, and extracts the biggest (in term of area) contours from it.
The code to extract and draw the 3 biggest contours from an image is the following:
 1from pyniryo.vision import (threshold_hsv,
 2                            ColorHSV,
 3                            morphological_transformations,
 4                            MorphoType,
 5                            KernelType,
 6                            biggest_contours_finder,
 7                            draw_contours,
 8                            show_img,
 9                            show_img_and_wait_close)
10
11img_threshold = threshold_hsv(img_test, *ColorHSV.ANY.value)
12img_threshold = morphological_transformations(img_threshold,
13                                              morpho_type=MorphoType.OPEN,
14                                              kernel_shape=(11, 11),
15                                              kernel_type=KernelType.ELLIPSE)
16
17cnts = biggest_contours_finder(img_threshold, 3)
18
19img_contours = draw_contours(img_threshold, cnts)
20
21show_img("init", img_threshold)
22show_img_and_wait_close("img with contours", img_contours)
Thresh + Opening |

|
3 contours |
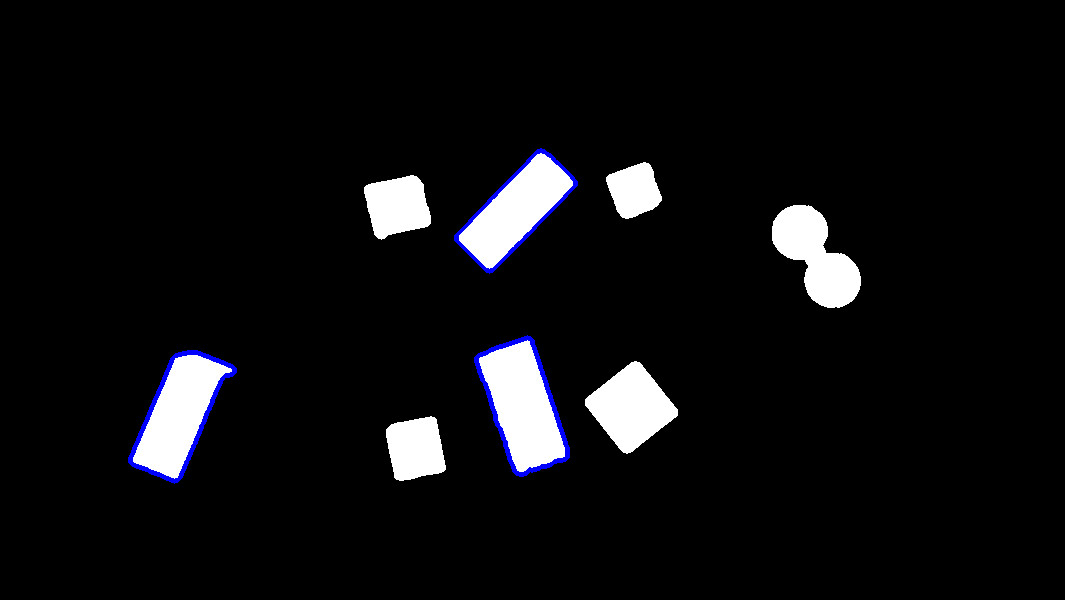
|
Find object center position
In order to catch an object, we need to find a pose from where the
end effector can grasp the object. The following method
uses contours which have been found in the previous section and finds their
barycenter and orientation via the functions
get_contour_barycenter() &
get_contour_angle().
 1from pyniryo import vision
 2
 3img_threshold = vision.threshold_hsv(img_test, *vision.ColorHSV.ANY.value)
 4img_threshold = vision.morphological_transformations(img_threshold,
 5                                                     morpho_type=vision.MorphoType.OPEN,
 6                                                     kernel_shape=(11, 11),
 7                                                     kernel_type=vision.KernelType.ELLIPSE)
 8
 9cnt = vision.biggest_contour_finder(img_threshold)
10
11cnt_barycenter = vision.get_contour_barycenter(cnt)
12cx, cy = cnt_barycenter
13cnt_angle = vision.get_contour_angle(cnt)
14
15img_debug = vision.draw_contours(img_threshold, [cnt])
16img_debug = vision.draw_barycenter(img_debug, cx, cy)
17img_debug = vision.draw_angle(img_debug, cx, cy, cnt_angle)
18vision.show_img("Image with contours, barycenter and angle", img_debug, wait_ms=30)
Thresh + Opening |
|
Barycenter + Angle |
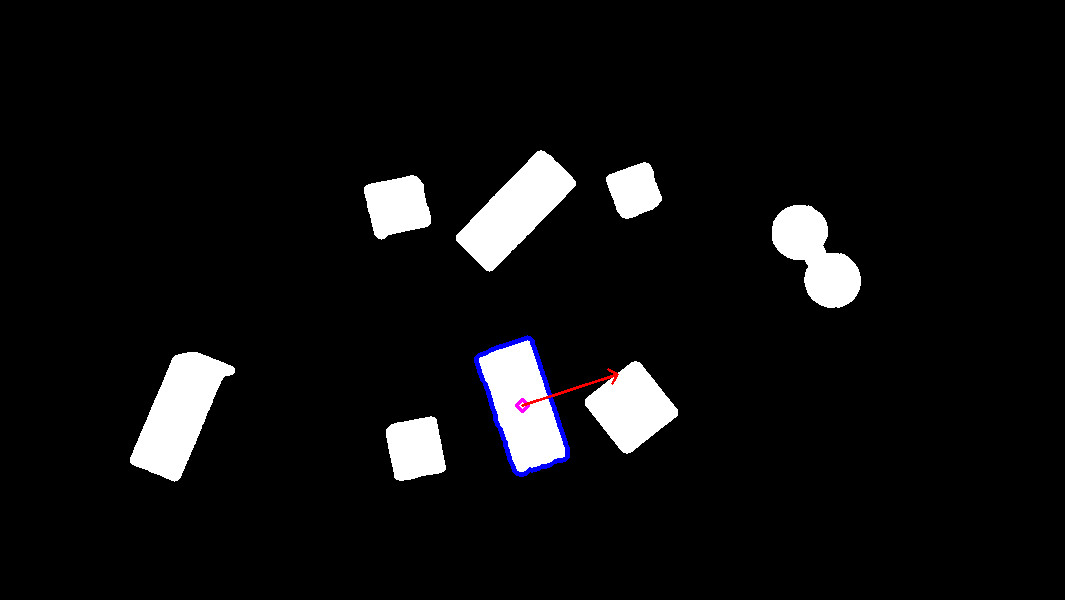
|
Note
The drawn vector is normal to the contour’s length because we want Ned to catch the object by the width rather than the length. Indeed, it leads to least cases where the gripper cannot open enough.
Markers extraction
As image processing happens in a workspace, it is important to extract
the workspace beforehand! To do so, you can use the function
extract_img_workspace().
1from pyniryo import extract_img_workspace, show_img, show_img_and_wait_close
2
3status, im_work = extract_img_workspace(img, workspace_ratio=1.0)
4show_img("init", img_test)
5show_img_and_wait_close("img_workspace", img_workspace)
Original |
|
Extracted |
|
Debug mode
If Ned’s functions are failing, you can use Debug functions which are
debug_threshold_color() &
debug_markers() in order to display what
the robot sees.
You can use the functions as follow:
1from pyniryo.vision import debug_markers, debug_threshold_color, show_img, show_img_and_wait_close, ColorHSV
2
3debug_color = debug_threshold_color(img_test, ColorHSV.RED)
4_status, debug_markers_im = debug_markers(img_test, workspace_ratio=1.0)
5
6show_img("init", img_test)
7show_img("debug_color", debug_color)
8show_img_and_wait_close("debug_markers", debug_markers_im)
Original |
|
Debug red |
|
Debug Markers |
|
Do your own image processing!
Now that you are a master in image processing, let’s look at full examples.
Display video stream with extracted workspace
In the current state, the following code will display the video stream and the extracted workspace image. You can add your own image processing functions maybe to apply additional process.
 1from pyniryo import NiryoRobot, PoseObject
 2from pyniryo import vision
 3
 4# Connecting to robot
 5robot = NiryoRobot('<robot_ip_address>')
 6robot.calibrate_auto()
 7
 8# Getting calibration param
 9mtx, dist = robot.get_camera_intrinsics()
10# Moving to observation pose
11observation_pose = PoseObject(0.2, 0.0, 0.3, 3.14, -0.01, -0.01)
12robot.move(observation_pose)
13
14while "User do not press Escape neither Q":
15    # Getting image
16    img_compressed = robot.get_img_compressed()
17    # Uncompressing image
18    img_raw = vision.uncompress_image(img_compressed)
19    # Undistorting
20    img_undistort = vision.undistort_image(img_raw, mtx, dist)
21    # Trying to find markers
22    workspace_found, res_img_markers = vision.debug_markers(img_undistort)
23    # Trying to extract workspace if possible
24    if workspace_found:
25        img_workspace = vision.extract_img_workspace(img_undistort, workspace_ratio=1.0)
26    else:
27        img_workspace = None
28
29    ...
30
31    # - Display
32    # Concatenating raw image and undistorted image
33    concat_ims = vision.concat_imgs((img_raw, img_undistort))
34    # Concatenating extracted workspace with markers annotation
35    if img_workspace is not None:
36        resized_img_workspace = vision.resize_img(img_workspace, height=res_img_markers.shape[0])
37        res_img_markers = vision.concat_imgs((res_img_markers, resized_img_workspace))
38    # Showing images
39    vision.show_img("Images raw & undistorted", concat_ims)
40    key = vision.show_img("Markers", res_img_markers, wait_ms=30)
41    if key in [27, ord("q")]:  # Will break loop if the user press Escape or Q
42        break
Vision pick via your image processing pipeline
You may want to send coordinate to Ned in order to pick
the object of your choice! To do that, use the function
get_target_pose_from_rel() which
converts a relative pose in the workspace into a pose in the robot’s world!
  1import cv2
  2
  3from pyniryo import NiryoRobot, PoseObject, ObjectColor, ObjectShape, vision
  4
  5# -- MUST Change these variables
  6simulation_mode = True
  7if simulation_mode:
  8    robot_ip_address, workspace_name = "127.0.0.1", "gazebo_1"
  9else:
 10    robot_ip_address, workspace_name = '<robot_ip_address>', "workspace_1"
 11
 12# -- Can Change these variables
 13grid_dimension = (3, 3)  # conditioning grid dimension
 14vision_process_on_robot = False  # boolean to indicate if the image processing append on the Robot
 15display_stream = True  # Only used if vision on computer
 16
 17# -- Should Change these variables
 18# The pose from where the image processing happens
 19observation_pose = PoseObject(0.17, -0.0, 0.35, -3.14, -0.0, -0.02)
 20
 21# Center of the conditioning area
 22center_conditioning_pose = PoseObject(0.01, -0.25, 0.13, 3.14, -0.01, -1.52)
 23
 24# -- MAIN PROGRAM
 25
 26
 27def process(niryo_robot):
 28    """
 29
 30    :type niryo_robot: NiryoRobot
 31    :rtype: None
 32    """
 33    # Initializing variables
 34    obj_pose = None
 35    try_without_success = 0
 36    count = 0
 37    if not vision_process_on_robot:
 38        mtx, dist = niryo_robot.get_camera_intrinsics()
 39    else:
 40        mtx = dist = None
 41    # Loop
 42    while try_without_success < 5:
 43        # Moving to observation pose
 44        niryo_robot.move(observation_pose)
 45
 46        if vision_process_on_robot:
 47            ret = niryo_robot.get_target_pose_from_cam(workspace_name,
 48                                                       height_offset=0.0,
 49                                                       shape=ObjectShape.ANY,
 50                                                       color=ObjectColor.ANY)
 51            obj_found, obj_pose, shape, color = ret
 52
 53        else:  # Home made image processing
 54            img_compressed = niryo_robot.get_img_compressed()
 55            img = vision.uncompress_image(img_compressed)
 56            img = vision.undistort_image(img, mtx, dist)
 57            # extracting working area
 58            im_work = vision.extract_img_workspace(img, workspace_ratio=1.0)
 59            if im_work is None:
 60                print("Unable to find markers")
 61                try_without_success += 1
 62                if display_stream:
 63                    cv2.imshow("Last image saw", img)
 64                    cv2.waitKey(25)
 65                continue
 66
 67            # Applying Threshold on ObjectColor
 68            color_hsv_setting = vision.ColorHSV.ANY.value
 69            img_thresh = vision.threshold_hsv(im_work, *color_hsv_setting)
 70
 71            if display_stream:
 72                vision.show_img("Last image saw", img, wait_ms=100)
 73                vision.show_img("Image thresh", img_thresh, wait_ms=100)
 74            # Getting biggest contour/blob from threshold image
 75            contour = vision.biggest_contour_finder(img_thresh)
 76            if contour is None or len(contour) == 0:
 77                print("No blob found")
 78                obj_found = False
 79            else:
 80                img_thresh_rgb_w_contour = vision.draw_contours(img_thresh, [contour])
 81
 82                # Getting contour/blob center and angle
 83                cx, cy = vision.get_contour_barycenter(contour)
 84                img_thresh_rgb_w_contour = vision.draw_barycenter(img_thresh_rgb_w_contour, cx, cy)
 85                cx_rel, cy_rel = vision.relative_pos_from_pixels(im_work, cx, cy)
 86
 87                angle = vision.get_contour_angle(contour)
 88                img_thresh_rgb_w_contour = vision.draw_angle(img_thresh_rgb_w_contour, cx, cy, angle)
 89
 90                vision.show_img("Image thresh", img_thresh_rgb_w_contour, wait_ms=30)
 91
 92                # Getting object world pose from relative pose
 93                obj_pose = niryo_robot.get_target_pose_from_rel(workspace_name,
 94                                                                height_offset=0.0,
 95                                                                x_rel=cx_rel,
 96                                                                y_rel=cy_rel,
 97                                                                yaw_rel=angle)
 98                obj_found = True
 99        if not obj_found:
100            try_without_success += 1
101            continue
102        # Everything is good, so we go to the object
103        niryo_robot.pick(obj_pose)
104
105        # Computing new place pose
106        offset_x = count % grid_dimension[0] - grid_dimension[0] // 2
107        offset_y = (count // grid_dimension[1]) % 3 - grid_dimension[1] // 2
108        offset_z = count // (grid_dimension[0] * grid_dimension[1])
109        place_pose = center_conditioning_pose.copy_with_offsets(0.05 * offset_x, 0.05 * offset_y, 0.025 * offset_z)
110
111        # Placing
112        niryo_robot.place(place_pose)
113
114        try_without_success = 0
115        count += 1
116
117
118if __name__ == '__main__':
119    # Connect to robot
120    robot = NiryoRobot(robot_ip_address)
121    # Changing tool
122    robot.update_tool()
123    # Calibrate robot if robot needs calibration
124    robot.calibrate_auto()
125    # Launching main process
126    process(robot)
127    # Ending
128    robot.go_to_sleep()
129    # Releasing connection
130    robot.close_connection()